|
|
[教学]入门microchip c18教程(PIC18F4620)
 [复制链接]
|
|
|

楼主 |
发表于 18-7-2009 11:42 PM
|
显示全部楼层
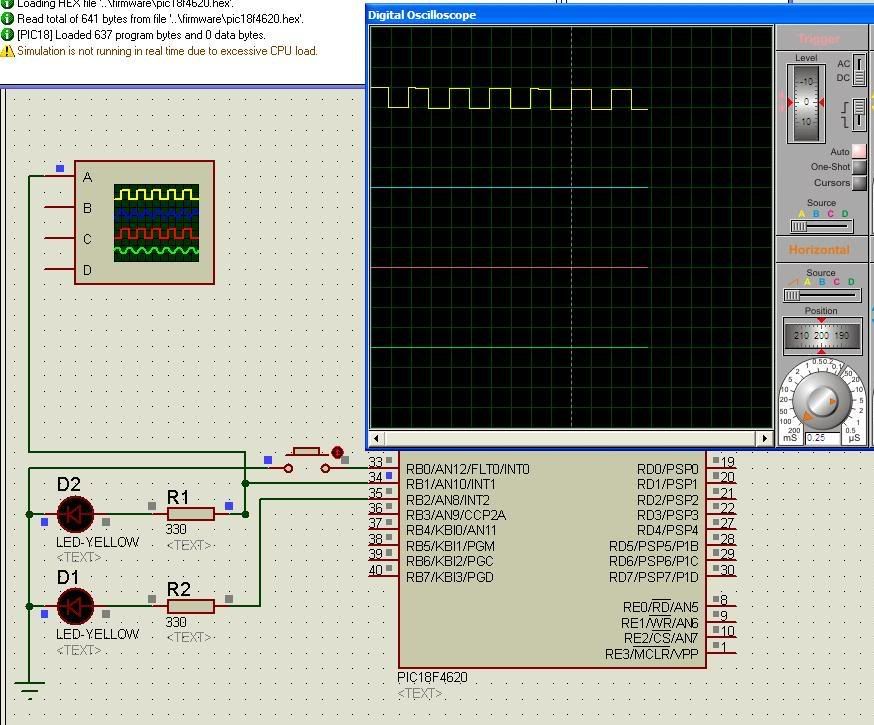
led blinking 3
接下来。还是led blinking.....
不过是用不一样的方法。。。。
今天用interrupt来做 led blinking.
pic18f的interrupt相对于pic16f的复杂。有priority之分。 不同priority的vector不一样。
不过这里用的是普通interrupt,没有priority之分。更深入的interrupt以后会在讨论。
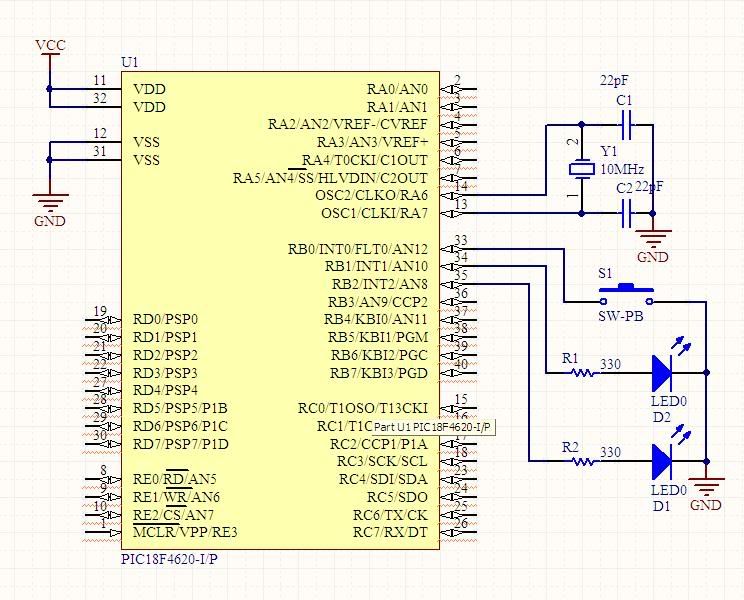
schematics 和15 楼的一样。
简单解释, interrupt是什么。
http://zh.wikipedia.org/wiki/%E4%B8%AD%E6%96%B7
最主要的功能是-:
出于性能上的考量。如果计算机系统没有中断,则处理器与外部设备通信时,它必须在向该设备发出指令后进行忙等待,反复轮询该设备是否完成了动作并返回结果。这就造成了大量处理器周期被浪费。引入中断以后,当处理器发出设备请求后就可以立即返回以处理其他任务,而当设备完成动作后,发送中断信号给处理器,后者就可以再回过头获取处理结果。这样,在设备进行处理的周期内,处理器可以执行其他一些有意义的工作,而只付出一些很小的、切换上下文所引发的时间代价。
(从wikipedia抄的。。。 ). ).
好地。。。。进入正题。 如何用中断来实现led blinking.
*加入了comment过后code有点乱。请自行把code copy去你喜欢的editor过后加以整理
*感谢waiweng83在interrupt function那边的更正。
直接skip configuration bit.因为和15楼是一样的。- unsigned char TimeOut = 0;
- void ISR (void);
void ISR (void) = 中断函数的 prototype. arguments void, return void.- void main (void)
- {
- unsigned int task1Cnt = 0;
- TRISBbits.TRISB1 = 0;
- WriteTimer0(55536); //set timer value
- OpenTimer0(TIMER_INT_ON & T0_16BIT & T0_SOURCE_INT & T0_PS_1_1); //configure and start timer
- INTCONbits.GIE = 1; //enable global interrupt
- while (1){
- if (++task1Cnt>250){ //check if count > 250ms
- LATBbits.LATB1 = !LATBbits.LATB1; //toggle led on latb1
- task1Cnt = 0; //clear task 1 counter
- }
- while (TimeOut == 0); //wait until interrupt occur
- TimeOut = 0; //clear timeout
- }
- }
OpenTimer0里面, TIMER_INT_OFF 改成 TIMER_INT_ON。
-〉这个为了enable timer0 interrupt.
INTCONbits.GIE = 1; //enable global interrupt
->很明显, 这个是为了enable global interrupt, 如果要用interrupt, 不论什么interrupt,这个bit 一定要enable.如果没有这个,即使你有enable timer interrupt. interrupt还是不会发生的。- if (++task1Cnt>250){ //check if count > 250ms
- LATBbits.LATB1 = !LATBbits.LATB1; //toggle led on latb1
- task1Cnt = 0; //clear task 1 counter
- }
怎样知道算250次过后就是250ms?
while (TimeOut == 0); //wait until interrupt occur
TimeOut = 0; //clear timeout
答案就在这里。 我等timeout occur. timeout 会在每1ms发生一次, 也就是我自己set的时间。关于如何算timer overflow时间, 请参考15楼。
当interrupt还没发生的时候, while (TimeOut == 0); program就会stuck在这里。
interrupt发生的时候,我就会把timeout set 成 "1", 就会break 刚才的while loop.
过后再把timeout reset = 0.所以每等while loop一次 = 1ms. 每个loop我increment task1Cnt 一次。
所以increment 250次过后 = 250ms 了。
接下来看看interrupt怎样写。- #pragma code
- #pragma interrupt ISR
- void ISR (void)
- {
- if(INTCONbits.TMR0IF){ //check is timer0 = source of interrupt
- T0CONbits.TMR0ON = 0; //stop timer
- WriteTimer0(55536); //reload timer value
- T0CONbits.TMR0ON = 1; //start timer
- TimeOut = 1;
- INTCONbits.TMR0IF = 0; //clear timer0 overflow flag
- }
- }
void ISR (void)。 这个ISR也是个名字而已, 你要abc都没问题。
由于全部interrupt会被direct来同一个vector 也就是0x08.所以无论什么interrupt source都会在这里处理。
要怎样知道那个interrupt source trigger interrupt,就是检查 他们的interrupt flag.
好像timer0, 当timer overflow的时候会导致interrupt.只要检查INTCONbits.TMR0IF就可以知道timer0 是不是interrupt source.
如果是timer0导致中断:
-重新设置timer0 value.
-set timeout
-clear interrupt flag.
当然你还可以加一些task/function.不过个人习惯, 通常我都不在interrupt做长篇大论。都用flag来trigger main loop。- #pragma code high_vector=0x08 //interrupt vector at 0x08
- void interrupt_at_high_vector (void)
- {
- _asm GOTO ISR _endasm
- }
根据mplabc18 userguide. 也就是mcc18\doc\hlpc18ug里面。
有写到。
MPLAB C18 does not automatically place an ISR at the interrupt vector. Commonly, a GOTO instruction is placed at the interrupt vector for transferring control to the ISR proper.
由于c18是不会直接把isr放在interrupt vector里面。 所以在interrupt vector 也就是code memory location 0x08里, 我们必须自己搞定, 用goto ->for transferring control to the ISR proper.
high_vector 和 interrupt_at_high_vector只是一个名字。
ISR就是你的interrupt function
完整的program.- #include <p18cxxx.h>
- #include <timers.h>
- #pragma config OSC = HSPLL //hspll osc
- #pragma config BOREN = OFF //no brownout reset
- #pragma config WDT = OFF //no watchdog
- #pragma config MCLRE = OFF //no mclr
- unsigned char TimeOut = 0;
- void ISR (void);
- void main (void)
- {
- unsigned int task1Cnt = 0;
- TRISBbits.TRISB1 = 0;
- WriteTimer0(55536); //set timer value
- OpenTimer0(TIMER_INT_ON & T0_16BIT & T0_SOURCE_INT & T0_PS_1_1); //configure and start timer
- INTCONbits.GIE = 1; //enable global interrupt
- while (1){
- if (++task1Cnt>250){ //check if count > 250ms
- LATBbits.LATB1 = !LATBbits.LATB1; //toggle led on latb1
- task1Cnt = 0; //clear task 1 counter
- }
- while (TimeOut == 0); //wait until interrupt occur
- TimeOut = 0; //clear timeout
- }
- }
- #pragma code high_vector=0x08 //interrupt vector at 0x08
- void interrupt_at_high_vector (void)
- {
- _asm GOTO ISR _endasm
- }
- #pragma code
- #pragma interrupt ISR
- void ISR (void)
- {
- if(INTCONbits.TMR0IF){ //check is timer0 = source of interrupt
- T0CONbits.TMR0ON = 0; //stop timer
- WriteTimer0(55536); //reload timer value
- T0CONbits.TMR0ON = 1; //start timer
- TimeOut = 1;
- INTCONbits.TMR0IF = 0; //clear timer0 overflow flag
- }
- }
[ 本帖最后由 fritlizt 于 19-7-2009 04:11 PM 编辑 ]
[ 本帖最后由 fritlizt 于 7-8-2009 11:55 AM 编辑 ] |
|
|
|
|
|
|
|
|
|
|
|
楼主 |
发表于 19-7-2009 04:17 PM
|
显示全部楼层
接下来。。。。c18 data types.
接下来。。。。c18 data types.
在programming的时候, 免不了要用到variables....当用variables的时候, 你必须要declare你的variables....
data type就是define 你的variable是属于哪一种类型的。。。。
每个compiler自己的data type代表的定义不一样。。。
给c18来说, 有几个data types,那就是(从user guide抄出来的):
char(1,2)
| 8 bits
| -128
| 127
| signed char
| 8 bits
| -128
| 127
| unsigned char
| 8 bits
| 0
| 255
| int
| 16 bits
| -32,768
| 32,767
| unsigned int
| 16 bits
| 0
| 65,535
| short
| 16 bits
| -32,768
| 32,767
| unsigned short
| 16 bits
| 0
| 65,535
| short long
| 24 bits
| -8,388,608
| 8,388,607
| unsigned short long
| 24 bits
| 0
| 16,777,215
| long
| 32 bits
| -2,147,483,648
| 2,147,483,647
| unsigned long
| 32 bits
| 0
| 4,294,967,295
|
在没有注明unsigned 还是signed下.默认都是signed.
未必每个compiler都是这样默认。 所以习惯上还是注明比较好。
pic18是8bit mcu. register data width = 8bits.做8bits的运算是最快的。
所以没必要的时候尽量使用unsigned char. 如果你有一个variable只需要0-200,你可以用:
unsigned char
short, unsigned short,
int, unsigned int,
short long,
unsigned short long
long
unsigned long.
都可以。。。。不过用short, int会用2bytes.再加上pic18f只是8bits mcu.做16 bits operation会比8bits operation来得慢。所以用int, short只是浪费时间, 浪费空间。 再加上如果用signed.浪费时间x2.
long 更够里, 不多说了。。。
所以, 根据自己需要, 来declare你的variables data type....mcu ram通常不是很多。。。。。
[ 本帖最后由 fritlizt 于 27-7-2009 10:41 PM 编辑 ] |
|
|
|
|
|
|
|
|
|
|
|
 发表于 1-8-2009 01:49 PM
|
显示全部楼层
发表于 1-8-2009 01:49 PM
|
显示全部楼层
|
补充以下,如果要用到 16 bits 的 variable 时,最好是养成习惯去用 signed short 或 unsigned short。因为 int 的 width 也是看 compiler 的。有些 compiler 的 int, signed int 和 unsigned int 是 32 bit 的 (大多数的 32 bits MCU)。 |
|
|
|
|
|
|
|
|
|
|
|
发表于 1-8-2009 02:01 PM
|
显示全部楼层
fritlizt 大大,你的 code 漏了点东西。- #pragma code high_vector=0x08 //interrupt vector at 0x08
- void interrupt_at_high_vector (void)
- {
- _asm GOTO ISR _endasm
- }
- #pragma code
- #pragma interrupt ISR
- void ISR (void)
- {
- if(INTCONbits.TMR0IF){ //check is timer0 = source of interrupt
- T0CONbits.TMR0ON = 0; //stop timer
- WriteTimer0(55536); //reload timer value
- T0CONbits.TMR0ON = 1; //start timer
- TimeOut = 1;
- INTCONbits.TMR0IF = 0; //clear timer0 overflow flag
- }
[ 本帖最后由 waiweng83 于 1-8-2009 02:06 PM 编辑 ] |
评分
-
查看全部评分
|
|
|
|
|
|
|
|
|
|
|
发表于 1-8-2009 02:25 PM
|
显示全部楼层
为什么我的source一直跑去other file的?还有只能compile .asm的file 而已吗? |
|
|
|
|
|
|
|
|
|
|
|
楼主 |
发表于 4-8-2009 08:41 PM
|
显示全部楼层
|
|
|
|
|
|
|
|
|
|
|
楼主 |
发表于 4-8-2009 09:01 PM
|
显示全部楼层
原帖由 wilson16 于 1-8-2009 02:25 PM 发表 
为什么我的source一直跑去other file的?还有只能compile .asm的file 而已吗?
不明白你的为题是怎样的, print screen上来看看。
在project wizard那边你要设定microchip c18.就可以compile c program了。
当然你要先install microchip c18. |
|
|
|
|
|
|
|
|
|
|
|
楼主 |
发表于 6-8-2009 10:48 PM
|
显示全部楼层
通用非同步收發傳輸器 UART
接下来介绍一各很普通的通讯协议UART.
它包括了RS232、RS499、RS423、RS422和RS485等介面標準規範和匯流排標準規範,即UART是非同步串列通信口的總稱。而RS232、RS499、RS423、RS422和RS485等,是對應各種非同步串列通信口的介面標準和匯流排標準,它規定了通信口的電力特性、傳輸速率、連接特性和介面的機械特性等內容。
http://zh.wikipedia.org/wiki/UART
普遍上拿来当作和电脑之间的通讯接口。 电脑也是有uart(也就是COM port),不过是RS232界面标准, 而PIC只是TTL. 如果要两者之间能够沟通, 需要一个level shifter.就是MAX232,能够转换TTL<->232。
PIC uart有好几种操作模式, synchronous master/slave, asynchronous 等。data方面可以是9 bits/8 bits
我直接解释asnychronous mode, 8 bits data,这个对我来说是最容易, 也是最简单的方法。
电脑方面也容易处理。
schematics:
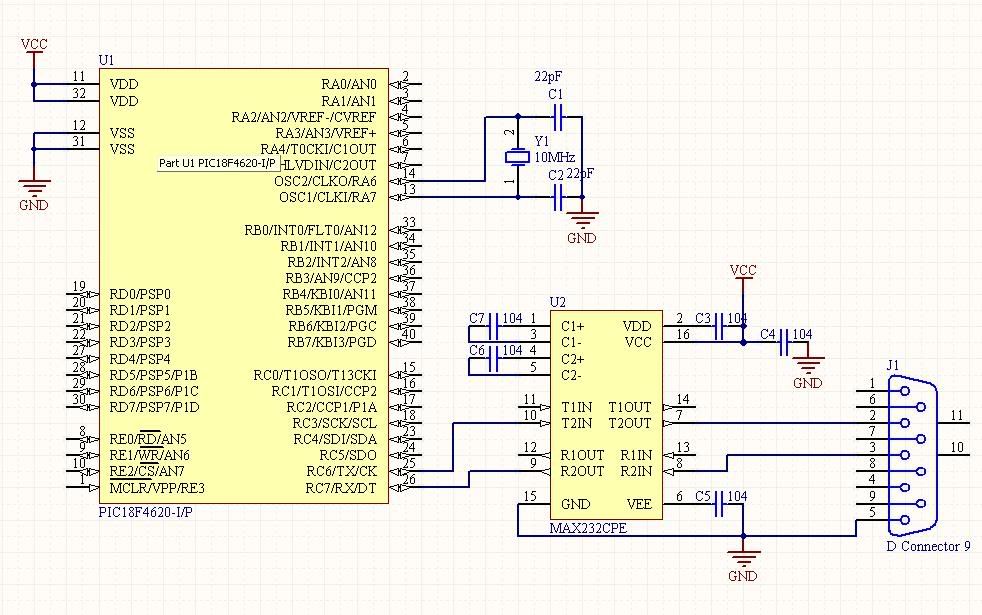
*在下面的例子, USART指的就是UART. 由于pic uart 也支持synchronous mode,就称为USART
asynchronous mode USART = UART..- #include <p18cxxx.h>
- #include <usart.h>
- #include <stdio.h>
- #pragma config OSC = HSPLL //hspll osc
- #pragma config BOREN = OFF //no brownout reset
- #pragma config WDT = OFF //no watchdog
- #pragma config MCLRE = OFF //no mclr
#include 方面, 由于用peripheral library做usart 用途, 需要include usart.h
stdio.h 是standard io header.由于我会用printf来把data 从usart print出去, 需要这个header file- #define BAUDRATE 9600
- #define BAUD_VAL 40000000/BAUDRATE/64 -1
- void main (void)
- {
- OpenUSART(USART_TX_INT_OFF & USART_RX_INT_OFF & USART_ASYNCH_MODE & USART_BRGH_LOW & USART_EIGHT_BIT, BAUD_VAL);
- printf ("testing123:%u\r\n", 23);
- while (1){
- if (DataRdyUSART()){ //if data available
- while (BusyUSART()); //wait until previous data sent
- WriteUSART(ReadUSART());//read buffer
- }
- }
- while (1);
- }
- int putc (char c, FILE *stream)
- {
- while (BusyUSART());
- WriteUSART(c);
- return c;
- }
主要是print一个formatted string.
然后就echo你所有的input.
openusart ->在你还没开始用usart之前,你必须做一些setting, 也就是你usart的操作模式。
这里我的设定是
Rx interrupt - off
Tx interrupt - off
Usart mode - Asynchronous
baudrate mode - USART_BRGH_LOW
data bits - 8
关于baudrate设定, 我用usart brgh low.
关于计算baudrate方程式可以参考pic18f4620 datasheet, chapter 18.1. Baudrate generator
openusart过后。。。。。。一切就绪。
如何发送/接受资料?
一些常用的library function:可以参考peripheral library user guide.
这些都是我copy过来的。
常用的有:OpenUSART, BusyUSART, DataRdyUSART, WriteUSART, ReadUSART
偶尔会用的:putsUSART, putrsUSART
Function
| Description
| BusyUSART
| Is the USART transmitting?
| CloseUSART
| Disable the USART.
| DataRdyUSART
| Is data available in the USART read buffer?
| getcUSART
| Read a byte from the USART.
| getsUSART
| Read a string from the USART.
| OpenUSART
| Configure the USART.
| putcUSART
| Write a byte to the USART.
| putsUSART
| Write a string from data memory to the USART.
| putrsUSART
| Write a string from program memory to the USART.
| ReadUSART
| Read a byte from the USART.
| WriteUSART
| Write a byte to the USART.
| baudUSART
| Set the baud rate configuration bits for enhanced USART.
|
通常BusyUSART和WriteUSART,会在一起使用
在你要write usart的时候, 你必须检查之前的data是否已经传送出去, 如果还没有, 你就传送下一个data,这就会造成data miss.
而DataRdyUSART和ReadUSART会在一起使用。
当要Read usart的时候, 你必须检查buffer里面时候有data给你, 没有的话read usart会一直给你之前的data.
putsUSART 是把整个string print 出去。
putrsUSART也是。
两者之间的分别就是string在data memory的时候, 用putsUSART.
string在program memory的时候, 用putrsUSART.
由于这个用法很麻烦, 有时候一不小心用错就麻烦。 再加上不能做formatted string.
所以通常要做formatted string output/string output,我用printf.
学过c的应该都懂printf吧。。。。。。。
int putc (char c, FILE *stream)
为什么需要这个呢。。。。由于printf 是用putc来output data得。。。。所以, 如果你要printf output 去usart.
over write putc这个function就可以了。
接下来是result and conclusion...
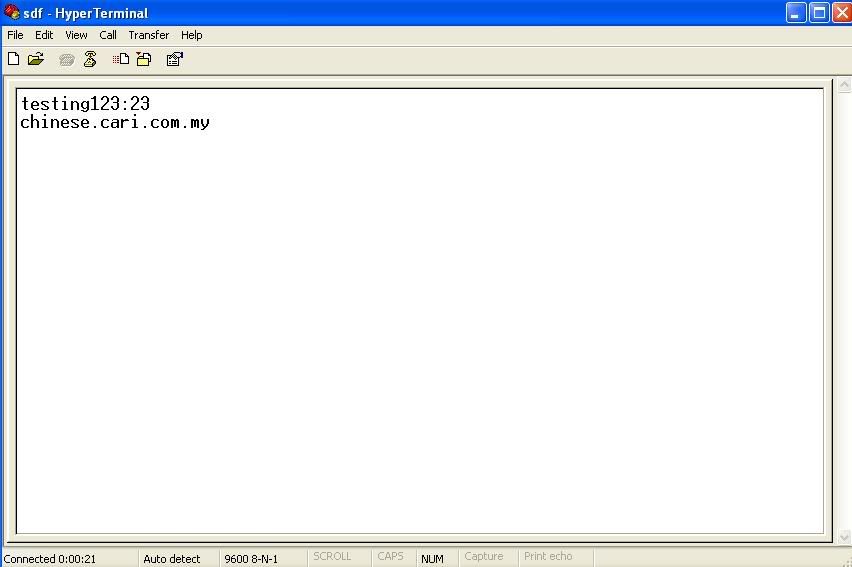
我用hyper terminal来和pic连线。
看看hyper terminal 设定。由于只是接rx, tx,gnd.所以flow control = none.
baudrate,我pic firmware用9600,当然这里也要一样 = 9600
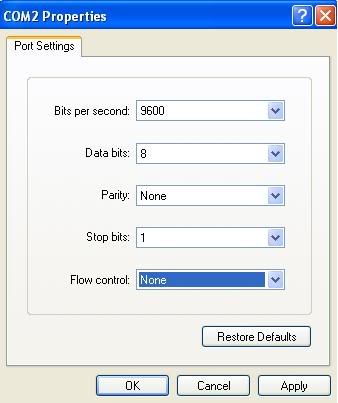
结果:一开始我就收到testing123:23
接下来, chinese.cari.com.my是我自己type的, 由于pic会echo回来, 所以我也收到chinese.cari.com.my
[ 本帖最后由 fritlizt 于 6-8-2009 11:10 PM 编辑 ] |
|
|
|
|
|
|
|
|
|
|
|
发表于 7-8-2009 02:50 AM
|
显示全部楼层
原帖由 fritlizt 于 4-8-2009 09:01 PM 发表 
不明白你的为题是怎样的, print screen上来看看。
在project wizard那边你要设定microchip c18.就可以compile c program了。
当然你要先install microchip c18.
那installer microchip c18 你有吗?谢谢! |
|
|
|
|
|
|
|
|
|
|
|
楼主 |
发表于 7-8-2009 11:53 AM
|
显示全部楼层
|
|
|
|
|
|
|
|
|
|
|
发表于 16-8-2009 12:30 AM
|
显示全部楼层
大家都用什么programmer啊?
JDM? |
|
|
|
|
|
|
|
|
|
|
|
楼主 |
发表于 16-8-2009 12:40 AM
|
显示全部楼层
原帖由 abue 于 16-8-2009 12:30 AM 发表 
大家都用什么programmer啊?
JDM?
我第一个是jdm.-->不错, 很容易diy.推荐给初学者。
参考这里
http://cforum4.cari.com.my/viewthread.php?tid=1634019&extra=page%3D1
现在我用pickit2 / icd2. |
|
|
|
|
|
|
|
|
|
|
|
发表于 16-8-2009 12:42 AM
|
显示全部楼层
用pickit2怎样烧program进ic?
我看到的只有1个黑盒子和一个usb cable罢了。。
是不是要另外买? |
|
|
|
|
|
|
|
|
|
|
|
楼主 |
发表于 16-8-2009 12:49 AM
|
显示全部楼层
原帖由 abue 于 16-8-2009 12:42 AM 发表
用pickit2怎样烧program进ic?
我看到的只有1个黑盒子和一个usb cable罢了。。
是不是要另外买?
会有header pin在尾段。 看datasheet有写。 分别就是Vpp, Vcc, Gnd, PGD, PGD.
接去你microcontroller的Vpp, Vcc, Gnd, PGD, PGC就可以了。
用mplab/pickit2 program烧录都可以。 |
|
|
|
|
|
|
|
|
|
|
|
发表于 16-8-2009 12:50 AM
|
显示全部楼层
也就是说接6条线去pic就可以烧了?
 |
|
|
|
|
|
|
|
|
|
|
|
发表于 16-8-2009 02:44 PM
|
显示全部楼层
我要几个问题想要请问fritlizt大大。。。
由于全部interrupt会被direct来同一个vector 也就是0x08.所以无论什么interrupt source都会在这里处理。-->这是固定的吗?
如果是timer0导致中断:
-重新设置timer0 value.
-set timeout
-clear interrupt flag.-->我们只要做这3个动作就行了吗?还是要另外加? |
|
|
|
|
|
|
|
|
|
|
|
楼主 |
发表于 16-8-2009 03:10 PM
|
显示全部楼层
|
|
|
|
|
|
|
|
|
|
|
发表于 16-8-2009 11:25 PM
|
显示全部楼层
|
|
|
|
|
|
|
|
|
|
|
发表于 17-8-2009 07:21 AM
|
显示全部楼层
对了大大您还没告诉小弟我是不是接6条线去pic就能烧program了?
(PICKIT2) |
|
|
|
|
|
|
|
|
|
|
|
楼主 |
发表于 17-8-2009 08:09 AM
|
显示全部楼层
原帖由 abue 于 17-8-2009 07:21 AM 发表
对了大大您还没告诉小弟我是不是接6条线去pic就能烧program了?
(PICKIT2)
vpp vcc gnd pgc pgd五条线就可以了 |
|
|
|
|
|
|
|
|
|
| |
本周最热论坛帖子
|


 3404
3404  147
147