|
|
家电中央无线遥控器系统[完成了,感谢所有帮过我的人]
 [复制链接]
|
|
|

楼主 |
发表于 1-11-2009 09:51 PM
|
显示全部楼层
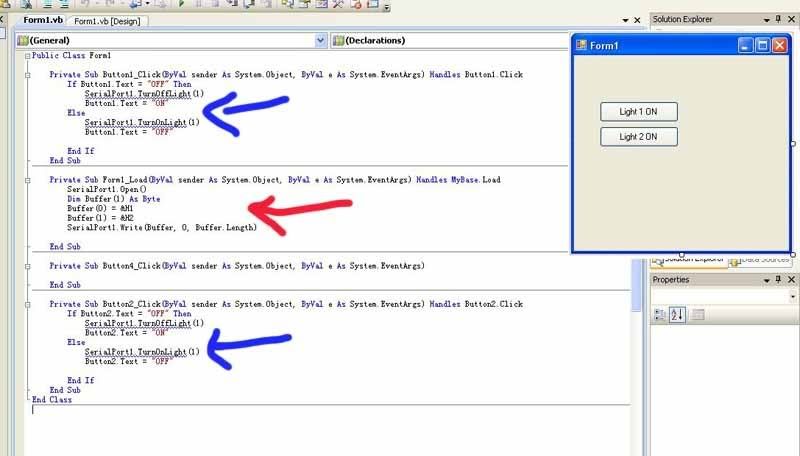
这个是我读了很多关于visual basic 的例子组合起来和modify 的(红色和蓝色)
但我只弄到这里不知道怎样继续了
请问版主能提点一下吗
 |
|
|
|
|
|
|
|
|
|
|
|
 发表于 3-11-2009 11:30 AM
|
显示全部楼层
发表于 3-11-2009 11:30 AM
|
显示全部楼层
|
|
|
|
|
|
|
|
|
|
|
发表于 3-11-2009 11:32 AM
|
显示全部楼层
原帖由 ^Hins86^ 于 1-11-2009 09:51 PM 发表 
这个是我读了很多关于visual basic 的例子组合起来和modify 的(红色和蓝色)
但我只弄到这里不知道怎样继续了
请问版主能提点一下吗
怎么会有serialport1.turnonlight(1)?
serialport1是serialport object吗?还是你其他的class inherit serial port class? |
|
|
|
|
|
|
|
|
|
|
|
楼主 |
发表于 3-11-2009 06:33 PM
|
显示全部楼层
|
|
|
|
|
|
|
|
|
|
|
楼主 |
发表于 3-11-2009 06:44 PM
|
显示全部楼层
原帖由 fritlizt 于 3-11-2009 11:32 AM 发表 
怎么会有serialport1.turnonlight(1)?
serialport1是serialport object吗?还是你其他的class inherit serial port class?
serialport1是serialport object
其实serialport1.turnonlight(1) 我觉得应该改成serialport1.write( , , )
不知道对不对
可是不知道里面要怎样写
format 我读到的是 SerialPort.Write(Byte[ ], Int32, Int32)
或 serialport.Write(buffer, offset, count)
可是就是不了解要怎样写
还有不知道这个方法对吗
基本上我写给button 的code 是 button 显示 ON (in off state)
然后 OFF( in on state)
其它的就是要写来send signal 给pic 来inteprete on/off light 1/light 2 了 |
|
|
|
|
|
|
|
|
|
|
|
楼主 |
发表于 4-11-2009 12:18 AM
|
显示全部楼层
最新update...不知道对不对

[ 本帖最后由 ^Hins86^ 于 5-11-2009 11:06 PM 编辑 ] |
|
|
|
|
|
|
|
|
|
|
|
楼主 |
发表于 5-11-2009 11:09 PM
|
显示全部楼层
刚刚读完p2p 的application note
我想问下
像我要控制两个receiver
我到底是用什么method 来给receiver 知道我现在是要send signal 给receiver 1/receiver 2
是用不同的channel吗?(我想知道它的keyword 是什么)

[ 本帖最后由 ^Hins86^ 于 6-11-2009 08:54 AM 编辑 ] |
|
|
|
|
|
|
|
|
|
|
|
楼主 |
发表于 12-11-2009 08:11 PM
|
显示全部楼层
版主最近不的空吗?
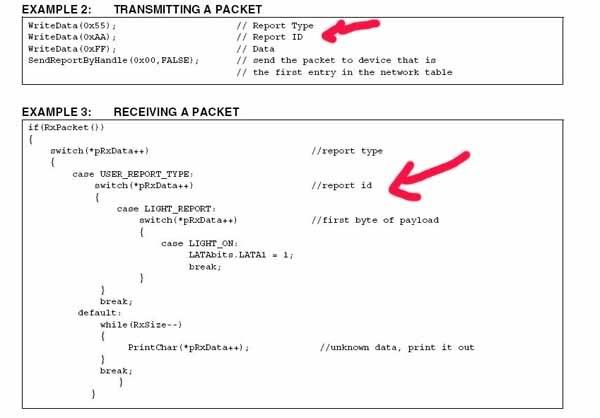
我大致上看完了p2p 和networking 的application note 了
我分不清有什么分别wor
我只知道supported topology 不同而已
haiz....
然后transmit 和receive 的我发现只不过是send 不同的id 来分辨而已
对吗?就像我放红箭头的地方
 |
|
|
|
|
|
|
|
|
|
|
|
楼主 |
发表于 16-11-2009 10:59 PM
|
显示全部楼层
fritlizt ,我想问下到底怎样写哦
之前你叫我看的p2p node 1 demo pic18 的
我看到里面的header file 有这么多样东西
是不是那些全部我都要用到的呢
我到底要program 些什么进我的pic 呢
我需要在下星期之前弄完le...
haiz.... |
|
|
|
|
|
|
|
|
|
|
|
发表于 17-11-2009 09:18 AM
|
显示全部楼层
原帖由 ^Hins86^ 于 16-11-2009 10:59 PM 发表 
fritlizt ,我想问下到底怎样写哦
之前你叫我看的p2p node 1 demo pic18 的
我看到里面的header file 有这么多样东西
是不是那些全部我都要用到的呢
我到底要program 些什么进我的pic 呢
我需要在下星期之前弄完 ...
从简单开始。用p2p node1 simple example开始。
先加hardware profile.让这个protocol stack可以support你的circuit board.
你只要search active project , keyword:" PICDEMZ ",你就可以看到4个result.
C:\Microchip Solutions\P2P\P2P Node 1\HardwareProfile.c:149: #if defined(PICDEMZ)
C:\Microchip Solutions\P2P\P2P Node 1\SimpleExampleNode1.c:190: #if defined(PICDEMZ) || defined(PIC18_EXPLORER)
C:\Microchip Solutions\P2P\P2P Node 1\HardwareProfile.h:59: //#define PICDEMZ
C:\Microchip Solutions\P2P\P2P Node 1\HardwareProfile.h:179: #if defined(PICDEMZ)
在picdemz附近,加入你的hardware profile即可。
原因我迟点再解释。
还有一个地方要改的就是configuration bit.你用的是25k20, 你看hardware profile.c的上面,有ifdef _18f4620, _pic18f2520 blabla bla 等等的东西。 看你如何设计你的circuit和怎样用,自行config.
所以你总共有五个地方要改。b4你进入programming.
先讲config bit.
给你hints.我的config bit 是
internal oscillator. ra6,7 as i/o
fail safe clock disable
Oscillator Switchover mode disabled
Brown-out Reset enabled and controlled by software (SBOREN is enabled)
VBOR set to 2.7 V nominal
WDT is controlled by SWDTEN bit of the WDTCON register
RE3 input pin enabled; MCLR disabled
The system clock is held off until the HF-INTOSC is stable
PORTB<4:0> pins are configured as digital I/O on Reset
CCP2 input/output is multiplexed with RB3
Single-Supply ICSP disabled
Background debugger enabled, RB6 and RB7 are dedicated to In-Circuit Debug
很多是不需要的,我只是看着config bit user manual写的时候, 顺便写下去。
接下来hardware profile.h里面的 //#define PICDEMZ
你会看到picdemz被comment掉。 因为default example是explorer 18
你要自己define 自己的board.可以是MY_BOARD或者其他, 名字你自己定
to be continue....... |
|
|
|
|
|
|
|
|
|
|
|
楼主 |
发表于 17-11-2009 05:28 PM
|
显示全部楼层
原帖由 fritlizt 于 17-11-2009 09:18 AM 发表 
从简单开始。用p2p node1 simple example开始。
先加hardware profile.让这个protocol stack可以support你的circuit board.
你只要search active project , keyword:" PICDEMZ ",你就可以看到4个result.
C: ...
我不了解是要怎样加hardware profile..还有什么circuit board 的
我只是pic 接去transceiver card 而已
没有用那个什么picdemz 的wo ..
我blur blur 了
config bit 我已经弄好了
之前你有跟我讲过了
#elif defined(18F25K20)
#pragma config FOSC = INTIO67 // Internal oscillator block, port function on RA6 and RA7
#pragma config FCMEN = OFF // Fail-Safe Clock Monitor disabled
#pragma config IESO = OFF // Oscillator Switchover mode disabled
#pragma config BOREN = ON // Brown-out Reset enabled and controlled by software (SBOREN is enabled)
#pragma config BORV = 27 // VBOR set to 2.7 V nominal
#pragma config WDTEN = OFF // WDT is controlled by SWDTEN bit of the WDTCON register
#pragma config MCLRE = OFF // RE3 input pin enabled; MCLR disabled
#pragma config HFOFST = OFF // The system clock is held off until the HF-INTOSC is stable.
#pragma config PBADEN = OFF // PORTB<4:0> pins are configured as digital I/O on Reset
#pragma config CCP2MX = PORTBE // CCP2 input/output is multiplexed with RB3
#pragma config LVP = OFF // Single-Supply ICSP disabled
#pragma config DEBUG = ON // Background debugger enabled, RB6 and RB7 are dedicated to In-Circuit Debug |
|
|
|
|
|
|
|
|
|
|
|
发表于 18-11-2009 06:48 PM
|
显示全部楼层
|
|
|
|
|
|
|
|
|
|
|
楼主 |
发表于 18-11-2009 08:23 PM
|
显示全部楼层
原帖由 fritlizt 于 18-11-2009 06:48 PM 发表 
现在你 没用microchip的板。不过他的program只是写给他的 development board 而已 。
如今你自己设计,一定会有一些minor得不一样。比如说 led iopin 之类的。
miwi program里面define 了一些development boar ...
那我之后要弄这个board 出来的吗?
还是我只是根据它(microchip development board) 里有的东西(i/on pin等等)
一模一样的define 另一个名出来而已,而其实我的tranceiver card 就只是接去pic18f25k20 而已?
而那些 i/o pin 还有其他东西就是define 给pic18f25k20 的pin 来得?
这就是我so far 不了解要怎样开始弄的原因
另外,我想请问下visual basic 用serial port send data 的default是什么format(binary.hex,ascii) 呢?
不好意思har...我好像一面用很多东西不明白
一面麻烦你
[ 本帖最后由 ^Hins86^ 于 19-11-2009 06:39 PM 编辑 ] |
|
|
|
|
|
|
|
|
|
|
|
楼主 |
发表于 21-11-2009 10:22 PM
|
显示全部楼层
|
|
|
|
|
|
|
|
|
|
|
发表于 22-11-2009 04:18 PM
|
显示全部楼层

先讲这个, 差不多了。
#define SPI_SDI PORTCbits.RC4
#define SDI_TRIS TRISCbits.TRISC4
#define SPI_SDO LATCbits.LATC5
#define SDO_TRIS TRISCbits.TRISC5
#define SPI_SCK LATCbits.LATC3
#define SCK_TRIS TRISCbits.TRISC3
这几个其实你不需要。 因为用hardware spi,这个是software spi pin assignment.
接下来是你的push button, led.你schematics 里面,你的push button和led接在哪里?
有schematics 吗? |
|
|
|
|
|
|
|
|
|
|
|
发表于 22-11-2009 04:27 PM
|
显示全部楼层

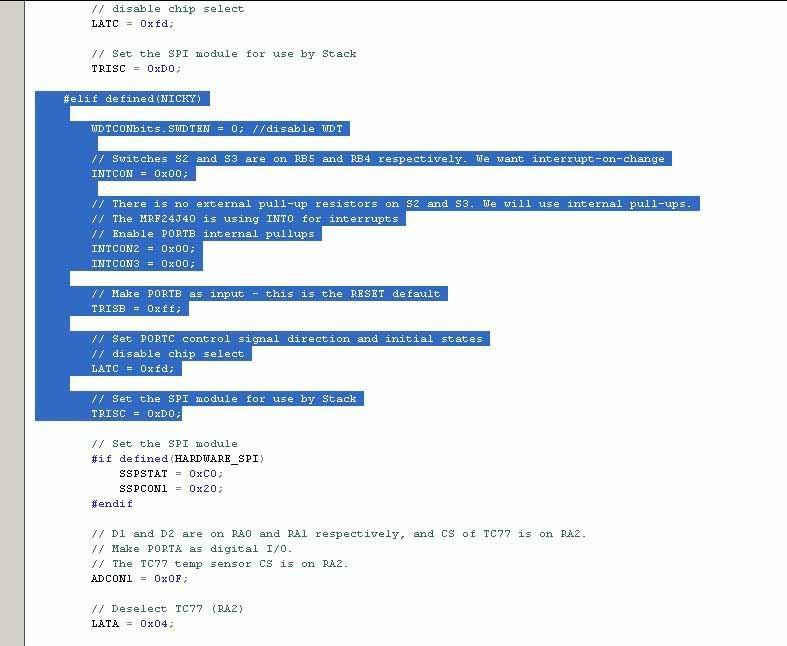
这个有点问题 。
上面那个#elif define (NICKY), 就没有了?
其实这里的define最主要是关于
INTCONbits.GIEH = 1; 这个bit 的define.
18f25k20也是这个没变。
explorer16由于某些原因, 这里不需要define 这个bit 的initial state.
所以应该是
-
- #if defined(PICDEMZ) || defined(PIC18_EXPLORER)
- INTCONbits.GIEH = 1;
- #elif defined(MY_BOARD)
- INTCONbits.GIEH = 1;
- #elif defined(EXPLORER16)
- #else
- #error "Unknown board. Please initialize board as required."
- #endif
接下来, 更不明白了。printf那里rb1 on nicky, rb2 on nicky, d1 on nickt, d2 on nicky.这些你怎么得来的?
怎么和你的
#define PUSH_BUTTON_1 PORTBbits.RB5
#define PUSH_BUTTON_2 PORTBbits.RB4
#define LED_1 LATAbits.LATA0
#define LED_2 LATAbits.LATA1
这里不一样啊???
printf只是把info 通过uart print 出去。 通过max3232你可以在hyper terminal看到这些info.其实不是很重要。他的作用就只是"for ur information" |
|
|
|
|
|
|
|
|
|
|
|
发表于 22-11-2009 04:42 PM
|
显示全部楼层
|
|
|
|
|
|
|
|
|
|
|
楼主 |
发表于 22-11-2009 04:58 PM
|
显示全部楼层
|
|
|
|
|
|
|
|
|
|
|
楼主 |
发表于 22-11-2009 05:02 PM
|
显示全部楼层
原帖由 fritlizt 于 22-11-2009 04:27 PM 发表
这个有点问题 。
上面那个#elif define (NICKY), 就没有了?
其实这里的define最主要是关于
INTCONbits.GIEH = 1; 这个bit 的def ...
这个等我edit 了再post 上来har...
rb1 on nicky, rb2 on nicky, d1 on nickt, d2 on nicky 我以为只是要自己define port 的名
哈哈。。我搞乱了 |
|
|
|
|
|
|
|
|
|
|
|
发表于 22-11-2009 05:02 PM
|
显示全部楼层
|
|
|
|
|
|
|
|
|
| |
本周最热论坛帖子
|


 3498
3498  68
68